How to Make Money with Tagly.to: Best Practices for Image Annotation & Avoid Bans

Image annotation is a crucial process in the development of artificial intelligence and machine learning models, particularly in the field of computer vision. It involves labeling or tagging elements within images – such as drawing bounding boxes around objects, classifying entire images, segmenting pixels, or marking keypoints – to create structured training data. This “ground truth” data teaches AI systems to recognize, classify, and understand visual information in the real world.
Common types of image annotation include:
- Bounding box annotation – Drawing rectangles around objects to indicate their location and size (widely used for object detection).
- Semantic segmentation – Labeling every pixel to define object boundaries precisely.
- Instance segmentation – Distinguishing individual instances of the same object class.
- Image classification – Assigning a single label to the whole image.
- Others like polygon annotation, keypoints (e.g., for pose estimation), or polylines.
Why is it needed? Modern AI applications – such as autonomous vehicles detecting pedestrians and road signs, medical imaging identifying tumors, facial recognition, retail inventory systems, and even social media content moderation – rely on vast amounts of accurately annotated images. Without high-quality annotations, models perform poorly, leading to errors, biases, or safety issues. As AI advances rapidly in 2026, the demand for precise annotation work continues to grow, creating flexible online earning opportunities for detail-oriented individuals.
Many people earn money as freelance annotators on platforms that crowdsource this work for AI companies. However, success depends on following best practices to deliver high-quality results, maintain high approval rates, earn bonuses, and avoid account issues.
Maximize Your Earnings as an Image Annotator: Essential Rules and Best Practices
Quality always beats speed. Annotating accurately and consistently leads to higher approval rates, bonuses, repeat assignments, and long-term earnings. Rushed or sloppy work often results in rejections, score drops, and potential suspensions or bans.
1. Use Tight but Complete Bounding Boxes
- Draw boxes as close as possible to the object without cutting off any part of it. Include all visible parts, even if heavily occluded. Aim for the box to touch the object’s contour on at least three sides whenever possible.
- Avoid huge padding or loose boxes – extra empty space confuses models and gets flagged as low quality.
- For truncated objects (partially out of frame): Annotate the visible part fully; do not ignore them unless guidelines explicitly say to skip.
- Tight, precise boxes are a top factor reviewers check. Sloppy or overly loose ones are a common rejection reason.
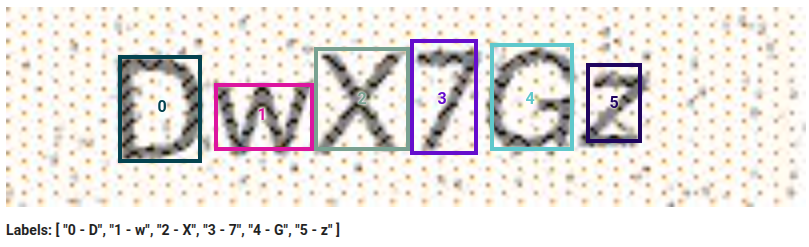
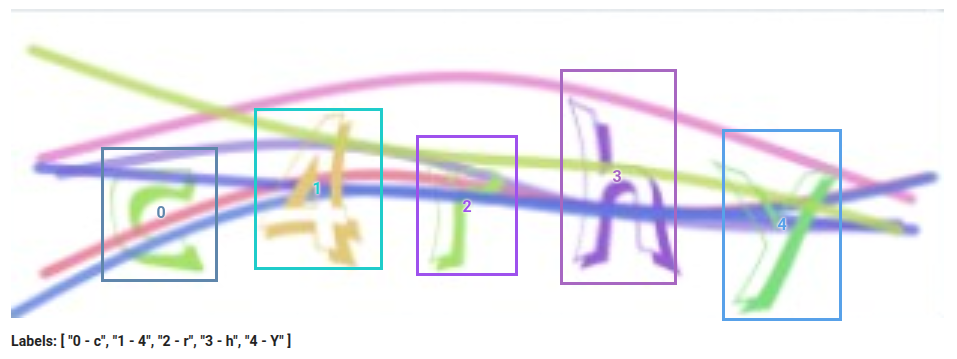
Here are some visual examples of good and bad bounding box practices:
2. Always Respect Min and Max Instructions – But Annotate Everything Correctly
These limits guide expected valid objects per image.
Avoid the misconception: “If min = 3, just label any 3 and skip the rest.” This is wrong and a top cause of suspensions.
Correct approach: Annotate every clearly visible instance that meets the class definition – no cherry-picking or skipping smaller/distant ones.
If you exceed the “max” significantly: You’re likely over-annotating (e.g., background noise, tiny irrelevant items, or misclassifying). Double-check guidelines for what counts as a valid target.
Real-world example: In text projects, focus on main/primary letters/numbers in focus; tiny background ones on distant signs may be out of scope. Read instructions carefully.
Bad example: Leaving out valid characters without boxes.

3. Select Correct Labels – Pay Special Attention to Case and Confusable Characters
In text, letter, or number projects, label accuracy (e.g., ‘A’ vs ‘a’, ‘I’ vs ‘l’ vs ‘1’) is critical. Reviewers scrutinize this heavily – consistent errors lead to fast rejections and bans.
Choose labels based on visual appearance and context. Use surrounding text for cues (e.g., font style, ascenders/descenders). If the text block is uppercase-heavy (signs, titles, plates), default to uppercase unless evidence otherwise.
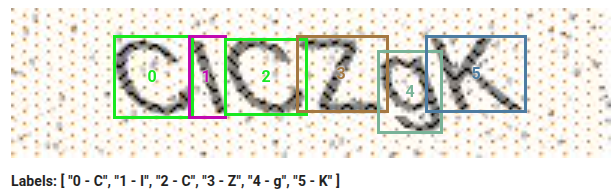
For confusables (‘O’ vs ‘0’, ‘S’ vs ‘5’, ‘Z’ vs ‘2’): Rely on context and patterns. Zoom in, compare to guideline examples, and stay consistent within the image/batch.
Inconsistent casing (e.g., mixing in the same word) is a major red flag.
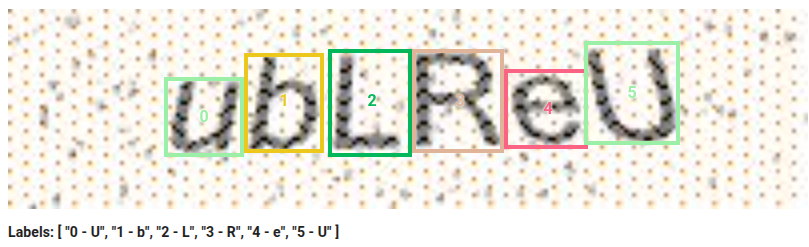
Bad example: Labeling a lowercase ‘u’ as uppercase in a mixed-case context.
4. Don’t Skip Tasks, Rush, or Do Poor/Incorrect Work – This Leads to Bans
Platforms track fast submissions, high skip rates on valid tasks, quality drops, or careless errors (especially wrong cases or sloppy boxes in text projects).
- Never skip “hard” or “low-paying” tasks – if accepted, complete properly. Excessive skipping flags unreliability.
- Don’t rush for volume – speed causes missed details, wrong labels, incomplete boxes, or inconsistencies.
- Repeated poor work builds a bad record. One rushed day can undo weeks of good performance.
Pro tip: Treat every task as gold-standard. Zoom, re-read guidelines, double-check confusables. Top earners work at a sustainable pace for higher hourly rates, priority high-pay tasks, bonuses, and trust.
Quick Summary / Cheat Sheet
- Tight + complete boxes only (no cutting parts, minimal padding).
- Label all valid, visible instances – no skipping to meet min.
- If way over max → re-check for invalid labels.
- Correct, context-based labels – especially case and confusables like I/l/1.
- No rushing, no excessive skipping, no careless work – quality and consistency keep you earning.
- Quality > quantity: Fewer perfect submissions beat many bad ones.
Following these rules builds a strong track record, unlocks higher-paying tasks, and keeps your account safe long-term. Many top annotators earn consistently by treating every image like it’s expert-reviewed – because it often is!
Ready to Get Started? Complete This Tutorial and Start Earning on Tagly.to
Image annotation offers flexible, remote work with real earning potential in 2026. Tagly.to is a professional crowdsourced platform where you can earn by annotating images for AI training. It provides high-quality tasks, competitive pay per approved task, fast daily payouts (with a low minimum of $0.50), and the freedom to work on your own schedule from any device or location.
Tagly features a variety of annotation tasks – including classification, detection (bounding boxes), and segmentation – with plenty of daily work available. You can join a growing global community of annotators from over 100 countries.
To begin:
- Create your account by clicking here.
- Complete the required tutorial – it covers standard annotation types and takes just a few minutes. Passing it unlocks access to paid tasks (note: the tutorial itself is not paid, but it’s essential for accuracy and consistency).
- Apply these best practices from day one to ensure high-quality submissions.
- Focus on consistency and accuracy to maintain strong approval rates, avoid rejections, and access more tasks over time.
With patience and attention to detail, you can turn Tagly.to into a steady side income or flexible gig. Many users report earning reliable pay by completing tasks steadily. Start today – complete the tutorial, submit your first accurate annotations, and begin building your earnings through AI training work!
If you’re ready, head over to tagly.to now to sign up and get started. Good luck, and happy annotating!